I have decided to build a small cabin to show how you can build a sturdy structure for shelter and or storage on a slim budget and have something that you can be proud of for decades.
I’ve seen the small cabin kits, and pre-made ones you can buy from the storage building companies, but they just don’t have the quality to last for the long haul. These “portable” buildings are usually made with the least amount of material possible and the cheapest supplies that can be purchased.
If you want a strong small building this cabin plan of mine will work great for you.

The design that I am working on can be built on any type of foundation as long as you can make it level. I’ll build mine on a wooden beam foundation which is basically built like a wooden deck. This will allow me to move the cabin easily from place to place. I’ll probably put a trailer axle mount underneath so I can move it to different places on the farm.
I think a stone and mortar foundation would be awesome for a cabin and the stone floor would be awesome. Maybe when I’ve picked a permanent location for a cabin I’ll make a stone and mortar foundation.
So… Where am I in the process? Let me switch to a timeline format so that you can follow along with the progress of the project. When it’s finished I’ll offer them for sale to anyone who wants one.
January 1st:
The idea springs into my head and I won’t stop obsessing until I’ve started.
My dog had discovered that he could push his way under the fence recently and I’d tied him up for a few days. So I stopped by the hardware store, and bought an entire bundle of 77 landscape timbers to attach to the bottom of my wire fencing.
I originally planned on using decking because it would look nice, but it would have cost over twice as the landscape timbers. As I finished attaching the timbers to the side of the fence he was getting out I decided to stack the rest so that they wouldn’t kill off more grass and get saturated when it rained.

After they were stacked I realized how it would make sense to build a small cabin out of landscape timbers. Here is a picture of the stack that gave me the inspiration.
January 2nd:
The fun research begins. Research is one of my favorite area and never really stops. But on this day I browsed online to decide what materials to use, how to construct a cabin, and even the feasibility. I learned a lot and took lots of notes and saved a bunch of resources onto my computer for reference.
The most important information I discovered is something I already knew but really needed it reinforced: do not finish out a living area with treated lumber. This meant since my timbers will act as my outer and inner walls then I would have to use untreated timbers.
January 3rd:
Today I called many different lumber yards and hardware suppliers to find untreated landscape timbers. After hearing a lot of “no”s I finally got a call back from a small lumber yard about an hour from my home.
They can get me all I could ever want as long as I buy them a bundle at a time, and give them about a week to get them in stock. The price is good so I have a supplier now.
Then I called a small portable building company to see if they would be interested in carrying a line of small cabins. I got good feedback and they want to see a sample.

That evening I tell my wife that I want to build a cabin for myself and then build them for others. She is wonderfully supportive of the plan and I’m excited to get started.
This evening I start sample designs on the computer. They are just two dimensional but it’s a good start to show what I’m trying to accomplish.
January 4th through 6th:
Planning continues. Making lists of supplies and budgeting the project begins. The plan is to keep the budget as low as possible, while building the best product I can. This means I won’t use inferior techniques or materials but will keep affordability in mind.

I built a sample corner to test notching and how they fit together. I decided on a but and pass style which doesn’t require notching the timbers to fit over each other, however because of the rounded sides it’s best to notch the side for the end to fit in.
The way they they fit together was great and the process was fairly easy and not overly time consuming. I’ll be testing chinking on this corner sample this week.
January 10th
Today I finally ordered a couple of bundles of untreated landscape timbers. I didn’t mean to put it off so long, but I was making sure that I had the budget. There are quite a few more supplies I’ll need, but I think a trip to lowe’s and mueller buildings for metal roofing will take care of it.
Today I also made a note to myself to go and take inventory of usable materials that I have already in my shop.
January 11th
Today I didn’t do much since I was busy with work but i did do a little more planning in the evening. The lumber yard did call to say the timbers had arrived.
January 12th – 13th
Picked up the landscape timbers and other building supplies, brought them home and then spend a lot of time unloading.

After some rest I started to lay out the foundation and cut the main boards to length.
Sunday I started screwing everything together and fitting the boards. I took my time on this part because I wanted to make sure everything was as square as possible.
January 14th and 15th
Monday I picked up some more decking. I thought I had enough in the shop already but some had been cut on and some of it wasn’t in good condition. So I got new decking and a window to install.
I was going to use an old window from another project, but I’m not cutting any corners with this one. I am going to use an old door from my house because it’ll look perfect on a cabin.
Tuesday I woke to about 1 to 2 inches of beautiful snow so I took the jeep out a little to have fun and then made a snowman. After that I did some inside work and when it warmed up a little I added more structure to the foundation. I wanted to over engineer and over build the foundation so that there wouldn’t be any future issues.

After that I finished squaring up the foundation and started the installation of the decking. I got almost all the way done screwing down the foundation before my cordless drill ran out of juice. By that time I was cold enough to call it a day.
January 16th
Today I finished the decking installation. Trimmed the edges and squared it all up.
After that I built the door frame. I’m using an old door from our farm house, I may swap it out later, but I think It’ll look really nice once it’s painted dark green to match the future roof. Plus it’s solid wood and once it’s sealed it should last in the weather.
I also did the flashing around the bottom so that the water will run down the foundation sides and not between the wall and the decking. Once that was on I laid my first run of timbers.
January 17th and 18th
These two days I continued laying runs of timebers. I only got in two half days due to mountains of paperwork calling me. But there was still lots of notching, gluing, cutting and nailing. It’s amazing how much labor goes into fitting the timbers together well. Even if they’re fairly uniform to begin with. I’m really happy with my progress so far.

January 19th through 21st
I worked a little on the cabin, making a run or two a day. Spent most of the time on mountains of paperwork getting our taxes in order. Big monkey off of my back!!!! Yay…
January 22nd
Today I spent the first of the morning finishing up a few business management tasks. Seems there are more and more of them every week I have to take care of.
But I did manage to get to working on the cabin in the morning and made really good progress today. I’ve made it far enough to set the window. I made the frame out of white spruce like the door frame.
It went really well and I’m happy with the results. However after I got it all put together I discovered that the window I purchased will not open! I thought it may be binding in my frame, took it out and it still won’t open. Checked to ensure it wasn’t locked and had my wife try it for good measure. Guess it’s a bad unit I’ll have to exchange it where I bought it.
January 23rd through January 31st
Construction has gone fairly smooth, only a few hiccups here and there. As you can see the walls are almost up to the top of the door, and I think for aesthetics that I’ll shorten the door to a little over 6 foot instead of keeping it 7 foot tall. I’m a shorter guy, and I like the shorter look. But I can put any size door on one a person could want. 
Towards the end of the week I worked on the diagrams and plans for the roof. I got a quote from a steel building company for metal roofing and almost had a heart attack at the price. So I called a company I dealt with in the past and got a reasonable price, 1/4 of what the first company quoted me!
I also got the supplies to caulk, stain and seal the structure, decking, insulation and inside paneling for the roof.
February 1st through the 7th
Work is coming along really, really well. The walls are completed and I’ve been working on the roof structure. I decided to use timbers for the roof beams and leave them exposed on the inside of the structure. 
I have most of the roof finished. I just need to put on the final decking and the green metal roof. I’ll need to enlist the help of a friend for this step. The roof should be finished by the end of the weekend.
This week I also talked to a small building company about the possibility of them carrying my cabins. They seemed really interested and I’ve sent some pictures and information over to them.
Earlier I mentioned that the window that I bought didn’t open. So I went and exchanged it. After problems with customer service trying to find the right one in the system, I checked out with my supplies and new window to discover when I got home I left the window sitting in the parking lot! Bet someone is enjoying their free window now. The store gave me 15% of another one when I told them what happened.
February 8th through 15th
I’m dangerously close to having a finished cabin. I’m only saying it this way because it’s been a rough journey with a lot of learning and back breaking work.
The excitement is hard to hold, I’ve already started marketing the cabins to a few different sources and have got some great feedback.
Last week I was working on the roof and the decking. That went well but I didn’t get as much done as I wanted this week. I hit myself in the shin (front of lower leg) really friggin’ hard with a 4 pound sledge hammer. It slowed me down for about three days, but I didn’t stop.
So that I could actually get some work done, I took a day to run around and gather up the last of the supplies and tools that I’ll need to finish the cabin. The only thing I’ll need is a cot size mattress pad for the bunk, and more exterior cedar tan caulk for the chinking… I’ve bought all Lowes had in stock twice so far.
With the shopping out of the way, and the money spent I started on the test caulk for seams where the log ends but up against each other. It didn’t quite go as well as I’d hoped. It was hard to get a good caulk seam with any type of penetration into the gap. To solve this problem I chiseled the ends with a small bevel so that there is a place for the caulk to make a good seam. It came out looking really good.
After that I sprayed the stain and sealant mixture and ensured it was good even coverage with a brush. I used a 4 year rated product that received only good reviews online. I plan to spray extra sealant on it once a year to keep it looking like new.
I also finished all the little trim pieces that needed to be done, started the folding table that will be inside the cabin, and drew up plans for the bunk on the back wall. I’m going to a conference next week and will miss working on it. I’ll be ready to get her wrapped up when I get back in town!
February 16th through 28th
For a week of this time I was out of town on business and leisure so I got back to work on the cabin around the 25th. The roofing was the next task to tackle. I ordered green metal roofing, but when I started the install I noticed that my roof had a slight bow from the peak to the overhang. This killed that Idea and I’ll build the roof different next time.
So I went with composite shingles. The nice 30 year ones. 
Shingling the roof went well since I have a lot of experience in that department. It took about 2 afternoons to finish it since I was doing it by myself. Up and down the ladder sucks up a lot of time.

Once the roof was finished I put a top cap on it of green sheet metal. This will help with durability and I like the way it looks.
During these two weeks I worked on various parts of the cabin. Some caulking (chinking) got done along with other remedial tasks like cleaning up the work area.
March 1st through March 14th
This week I finished the exterior chinking and it’s now completely weather tight!
This gets me on the home stretch, almost done!
I finished up most of the detail work and hung the door so that I could get ready to move the cabin out to the yard. 
The Move!
After everything was shored up and ready I got started on the move.
The plan was to cut out the top bar on my pipe fence, roll the fencing back and winch the cabin into the yard while rolling it on pieces of metal and pvc pipe- kinda like the egyptians would have done it.
It took a day to get everything prepared and ready and in place.
I used a heavy duty come-along and all the chains I owned to move the cabin. It’s much heavier than a traditional storage building or frame building.
During the mental and physical drain of moving the cabin I blanked on taking good pictures of the process.
I did take a picture once it was in the back yard, but not it’s final resting place.
After it was in the yard I took the rest of the evening to rest. The next day I finished putting in it’s place on the northern side of the yard facing the south.
For the flooring I decided to use brown outdoor carpeting that I got from a furniture store that closed down. It looked really great.
After that a cot, shelf and other accessories added and the cabin is ready!
Just as there is more than one way to skin a cat, there are many different ways to build a small cabin.
Depending on your situation, budget, use, location, or available materials the best way to build a personal cabin will vary greatly.
I’ve loved cabins and small buildings since I was a young boy. Checkout CabinPorn (no it’s not sexual) for some epic cabin pictures from all over the world.
Update: January 2015
The little log cabin is still beautiful! (picture coming soon).
There has been a tiny bit of maintenance on the cabin. The door needed a little caulking. I reused a solid wood interior door, but painted it with heavy duty porch paint lacquer. Assuming this would completely seal the door … it would have worked out great.
But the door is starting to split where the panels meet. It’ll need to be re-done somehow but most likely an exterior grade door will need to be acquired.
Some chinking to fill in checks and cracks in the logs that have appeared over the last year was needed as well. This is common … especially considering the logs were not fully seasoned when the little cabin was built.
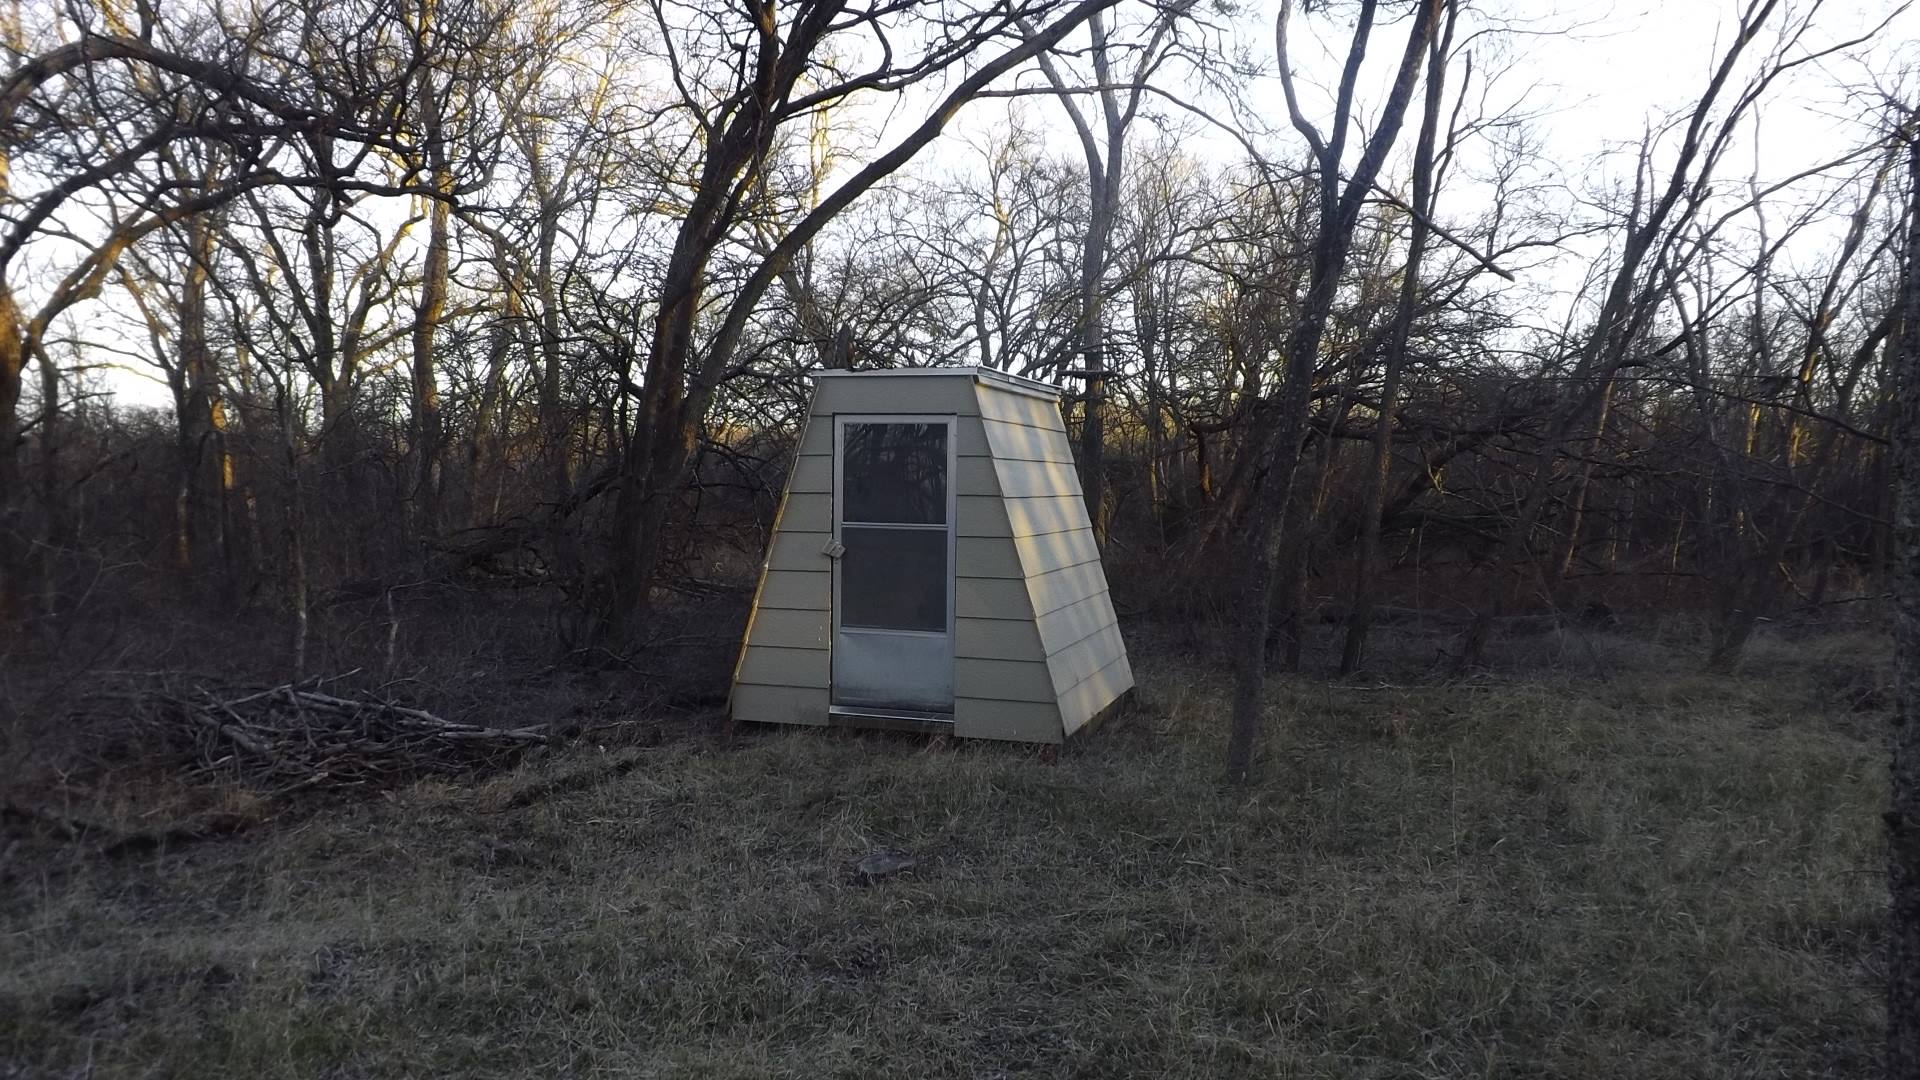
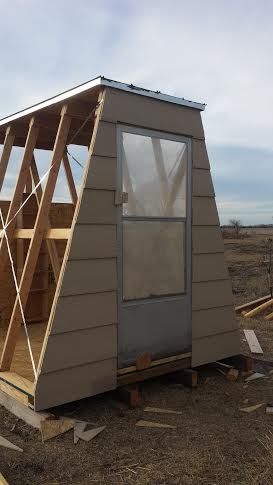
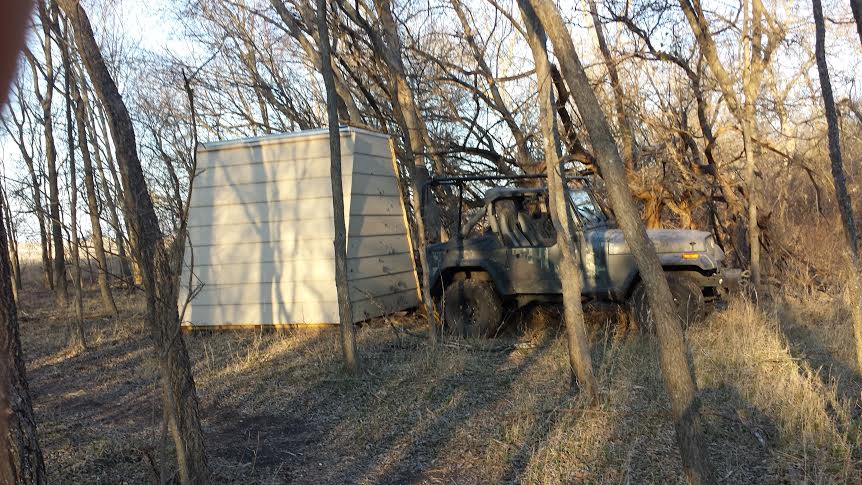
New Cabin Project February 2015
This winter of 2014 to 2015 the building itch came back again. Not wanting to get into a large time and labor intensive project I opted for an easy-to-build stick frame micro cabin. And there was a great place out by the camp for it to sit when finished.
It didn’t need to be large at all since it’s only a little over a mile down the road from our house it’ll only be used for little overnight stays. Basically an upgraded wooden tent …
Here is a quick, paraphrased, run-down of my build plan:
More details and pictures about the build are to follow. Here are a few teasers. It’s not painted or trimmed out yet.